Shared network databases
This article describes how to set up a shared ProNest 2025 database over a network, with all clients using the same ProNest 2025 database.
General information
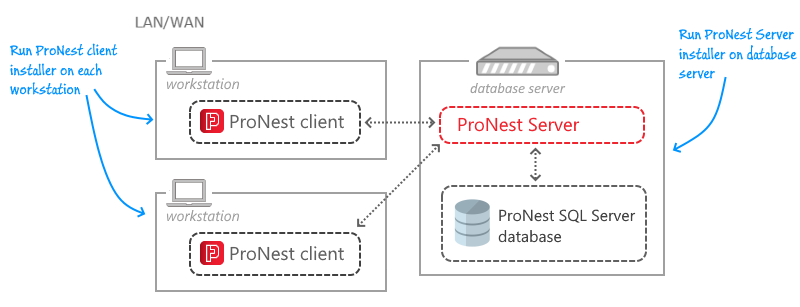
ProNest uses Microsoft SQL Server Express for both local and shared network databases. Additionally, ProNest uses a REST API to exchange information between ProNest and the SQL Server database. This application is called ProNest Server.
Both ProNest Server and the database are required to use ProNest. They can be installed locally, on the same PC as ProNest, or installed on a remote location on the network.
For most applications, a local database is sufficient. This is common for stand-alone installations of ProNest, where you are running everything on a single computer (the ProNest client and the database itself).
In multi-user environments, you may want to share your database over a network. This is commonly done if there are multiple workstations with ProNest and you want to share materials, part library, plate inventory, work orders, costing, or job information.
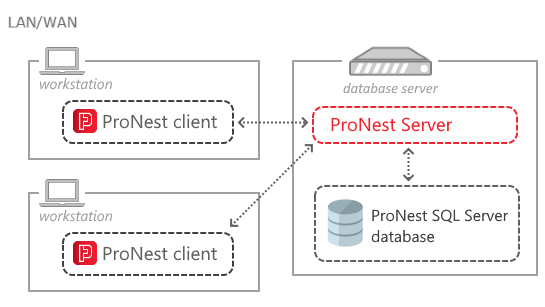
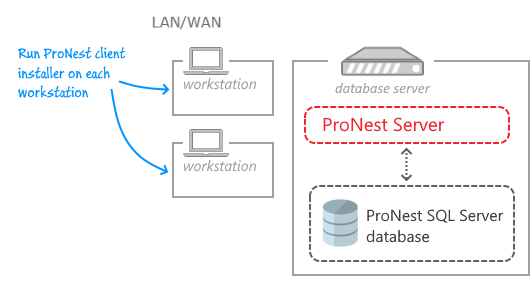
A typical ProNest shared network database setup
For multi-user environments where ProNest clients share a common database over a network, a separate installer is available, which installs ProNest Server and the ProNest database only.
Setting up a shared network database
Step 1: Specify a database server
Designate a computer or server on the network that will run ProNest Server and host the common database. This will be the database server.
Typically, ProNest Server and the ProNest database are installed on the same server (as pictured above). However, you can install and run ProNest Server on a different machine than the database host, if needed.
Regardless of the setup, each of these components must be installed on a PC or server that remains on. The PC or server that is running ProNest Server must be accessible by other ProNest client PCs on the network.
You should not designate a domain controller (DC) server as the database server.
Step 2: Install ProNest Server on the database server
- Download and run the stand-alone ProNest Server installer on the database server.
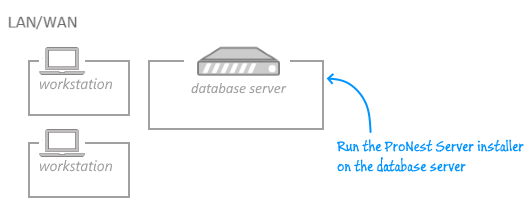
Be sure to install with administrator privileges.
By default, this will install the ProNest Server application, SQL Server Express with the PRONEST instance, and the ProNest database, on the server.
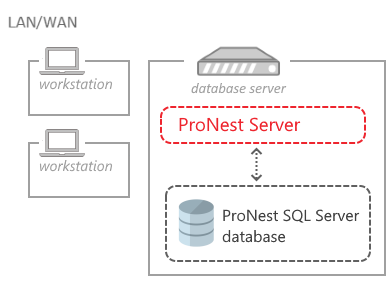
Note that during installation, you can choose to host the ProNest database on a different machine than ProNest Server, if needed:
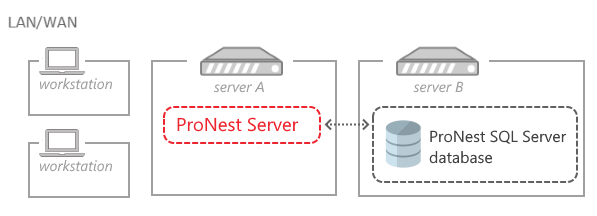
In that case, run the ProNest Server installer on the machine where you want ProNest Server (server A in the image above). You can then select a different database host (server B) during installation.
This separated configuration requires that ProNest Server is able to connect to a remote SQL Server database over a network. You may need to adjust firewall settings, SQL Server Configuration settings, as well as security and connection settings for the host database instance in SSMS.
Step 3: Install ProNest on each client PC
On each workstation on which you will be running ProNest, install the ProNest client.
- Download and run the ProNest installer on each workstation.
Be sure to install with administrator privileges.
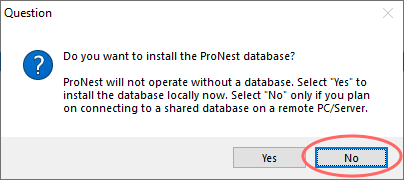
During installation, when prompted with Do you want to Install the ProNest database? select No.
Step 4: Point clients to shared ProNest Server database
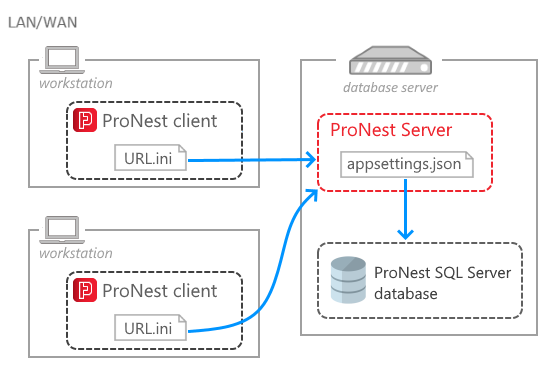
Next, you'll need to point each ProNest client to the machine that is running ProNest Server.
- On a client PC, open ProNest.
- As long as ProNest Server hasn't been installed on that PC, you will be prompted with a "Could not connect to ProNest Server" message.
- In this box, select Shared on the network.
- For Host, enter the address of the server with ProNest Server installed. You can use a PC name or an IP address.
- For Port, enter the port on that computer used by ProNest Server. The default port used by ProNest Server is 1480. You can typically leave this set to 1480. However, if ProNest Server is using a different port on that PC, be sure to enter the appropriate port.
- On the computer running ProNest Server, press Windows key + S, then type
resmon. - On the Network tab, under Listening Ports, the port for ProNestServer.exe is listed.
- Click Test connection to make sure that the ProNest client is able to connect to the network database.
- Click Close when finished.
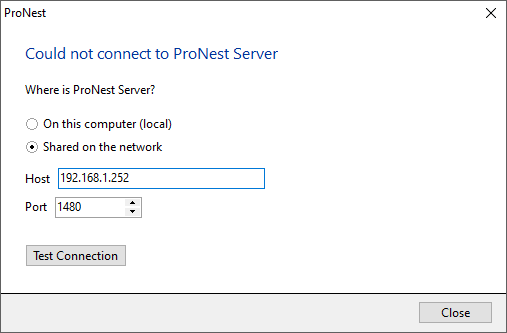
For instance, if the PC name of the host is MYSERVER and the IP address is 12.34.5.67, you could enter either MYSERVER or 12.34.5.67 for the Host.
If you don’t know the port number, you can find it as follows:
Your changes will be saved locally on the ProNest client PC, in this text file:
C:\ProgramData\Hypertherm CAM\ProNest 2025\URL.ini
If you are setting up many ProNest clients, you can just edit the URL.ini file for one client to point to ProNest Server, then copy and paste that file into C:\ProgramData\Hypertherm CAM\ProNest 2025 on each of the remaining client PCs.
If you have taken all of the above steps and still cannot successfully set up your ProNest databases, please contact Hypertherm.
Updating ProNest in a shared database environment
Version compatibility
If you are using ProNest in a multi-user environment with a shared database, we recommend that all ProNest clients and ProNest Server are running the latest version. This way you get all of the most recent features and improvements that are available.
ProNest Server 2025 is backward compatible with older ProNest clients. At minimum, we recommend keeping ProNest Server 2025 on a version that is greater than or equal to the version of the ProNest clients.
Some previous major versions of ProNest (ProNest 2019, ProNest 2017) are incompatible with the ProNest 2025 database. For example, you should not point a ProNest 2019 client to ProNest Server 2025.
How to update ProNest and ProNest Server
ProNest clients and ProNest Server can be updated with the same installers that are used for a new installation. These are available on the CAD/CAM Knowledge Base.
